Designer Toolbar

 
The toolbar provides quick access to the most common visual designer operations and commands over the design layers.
1. Pointer

Pointer

Press the button to reset editing mode and to turn the mouse into simple pointer.
2. Add~Image Layer

Add Image Layer

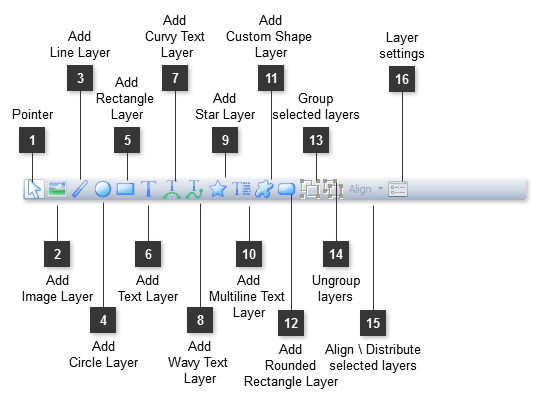
Press the button to select an image file to insert as a new layer. Once you have selected the file select a rectangle region with mouse in designer area to insert the image there.
3. Add~Line Layer

Add Line Layer

Press the button to turn on the new layer insertion mode and drag the mouse over the designer area to draw a line object.
4. Add~Circle Layer

Add Circle Layer

Press the button to turn on the new layer insertion mode and drag the mouse over the designer area to draw a circle object.
5. Add~Rectangle ~Layer

Add Rectangle  Layer

Press the button to turn on the new layer insertion mode and drag the mouse over the designer area to draw a rectangle object.
6. Add~Text Layer

Add Text Layer

Press the button to turn on the new layer insertion mode and drag the mouse over the designer area to create a new text object. Then double click on the text object to edit its content.
7. Add~Curvy Text~ Layer

Add Curvy Text  Layer

Press the button to turn on the new layer insertion mode and drag the mouse over the designer area to create a new curvy text object. Then double click on the created object to edit its content.
8. Add~Wavy Text ~Layer

Add Wavy Text  Layer

Press the button to turn on the new layer insertion mode and drag the mouse over the designer area to create a new wavy text object. Then double click on the object to edit its content.
9. Add~Star Layer

Add Star Layer

Press the button to turn on the new layer insertion mode and drag the mouse over the designer area to draw a star object.
10. Add~Multiline Text ~Layer

Add Multiline Text  Layer

Press the button to turn on the new layer insertion mode and drag the mouse over the designer area to create a new multiline text object. Then double click on the object to edit its content.
11. Add~Custom Shape ~Layer

Add Custom Shape  Layer

Press the button to turn on the new layer insertion mode and drag the mouse over the designer area to insert a custom shape object.
12. Add~Rounded~Rectangle Layer

Add Rounded Rectangle Layer

Press the button to turn on the new layer insertion mode and drag the mouse over the designer area to draw a rectangle object with rounded color.
13. Group~selected layers

Group selected layers

Use this button to group several selected layers into a single set.
14. Ungroup~layers

Ungroup layers

Use this button to ungroup a selected set into several original layers.
15. Align \ Distribute~selected layers

Align \ Distribute selected layers

Click the button and use its pull down menu commands to properly align or distribute the selected layers.
16. Layer~settings

Layer settings

Click the button to open the Layer Settings dialog for the selected layer.

Created with DrExplain